참고)

https://velog.io/@thinkp92/Express-Sequelize-with-PostgreSQL-database%EB%A5%BC-%EC%82%AC%EC%9A%A9%ED%95%98%EC%97%AC-Node.js-Restful-CRUD-API-%EA%B5%AC%ED%98%84%ED%95%98%EA%B8%B0

https://www.daleseo.com/js-node-es-modules/


Node.js Restful CRUD API 구현하기

※ 참고한 블로그 글은 commonjs로 구현되어 있는데 나는 다른 프로젝트를 ES module로 하였기 때문에 연습을 위해서 바꾸었다.
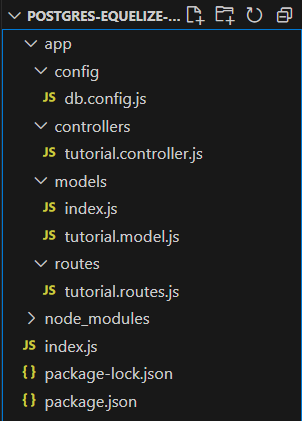
 

[폴더 구조]

1. node.js 프로젝트 생성

  1. 프로젝트 폴더 만들기
  2. npm init을 하고 package.json 자동 생성하기
  3. package.json에 "type":"module" 추가
  4. postgreSQL과 Express와 Sequelize 관련 모듈 설치하기
npm install express sequelize pg pg-hstore body-parser cors --save


2. index.js와 mvc 패턴을 위한 파일 생성

  1. index.js
  2. app/routes/tutorial.routes.js
  3. app/config/db.config.js
  4. app/controllers/tutorial.controller.js
  5. app/models/index.js , app/models/tutorial.model.js


3. index.js

  • app.listen위에 app.use를 모두 적어야 한다.
  • db.sequelize.sync()의 위치는 상관은 없어보인다.
import express from "express";
import bodyParser from "body-parser";
import cors from "cors";
import db from "./app/models/index.js";
import tutorialRouter from "./app/routes/tutorial.routes.js"

const app = express();
db.sequelize.sync()
  .then(() => {
    console.log("DB Connection successful");
  }).catch((err) => {
    console.error(err);
  })

var corOptions = {
  origin: "http://localhost:8081",
};

app.use(cors(corOptions));

// parse requests of content-type - application/json
app.use(bodyParser.json());

// parse requests of content-type - application/x-www-form-urlencoded
app.use(bodyParser.urlencoded({ extended: true }));

// simple route
app.get("/", (req, res) => {
  res.json({ message: "Welcome to my application." });
});

app.use("/api/tutorials", tutorialRouter);

// set port, listen for requests
const PORT = process.env.PORT || 8080;
app.listen(PORT, () => {
  console.log(`Server is running on Port ${PORT}!`);
});


4. app/routes/tutorial.routes.js

  • tutorial.controller.js 에서 export를 여러개로 나눠서 작성했기 때문에 import * as [별명] from '~~' 이렇게 작성하여 한번에 불러올 것이다.
import * as express from 'express';
const router = express.Router();
import * as tutorials from "../controllers/tutorial.controller.js";
    
// Create a new Tutorial
router.post("/", tutorials.create);

// Retrieve all Tutorial
router.get("/", tutorials.findAll);

// Retrieve all published Tutorial
router.get("/published", tutorials.findAllPublished);

// Retrieve a single Tutorial with id
router.get("/:id", tutorials.findOne);

// Update a Tutorial with id
router.post("/:id", tutorials.update);

// Delete a Tutorial with id
router.delete("/:id", tutorials.delete);

// Delete all Tutorial
router.delete("/", tutorials.deleteAll);

export default router;


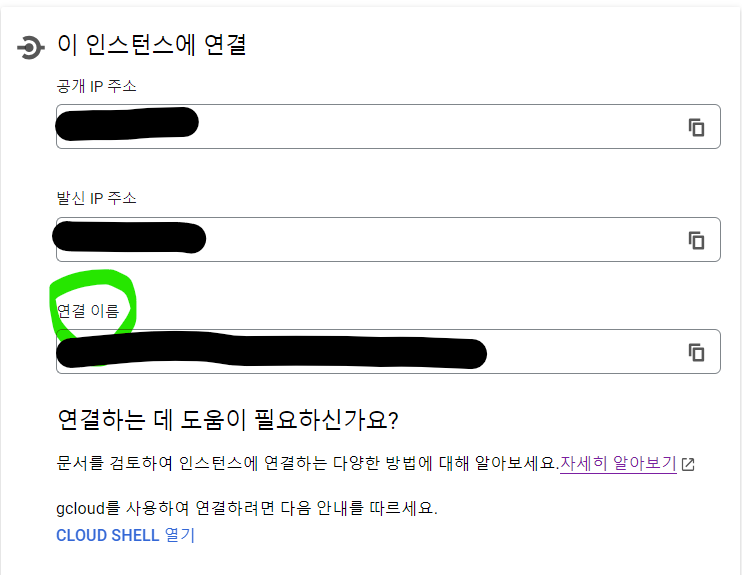
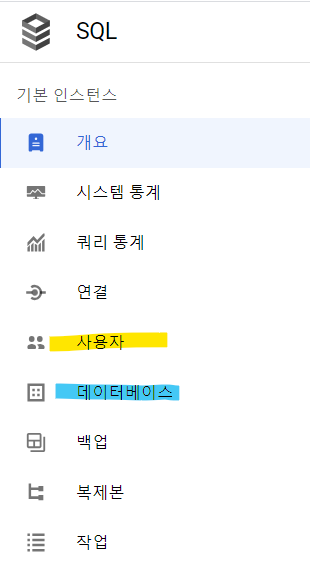
5. app/config/db.config.js

  • PostgreSQL Shell 등에서 새로운 DB를 만들고 정보를 아래에 적는다. 
  • dialect는 여러 데이터베이스 (MS-SQL, Oracle, MySQL,PostgreSQL 등) 간에 변경을 용이하게 해준다. 지금은 "postgres"로 설정한다.
export const HOST = ""; // 127.0.0.1
export const USER = ""; // postgres (기본)
export const PASSWORD = "";
export const DB = "";
export const dialect = "postgres"; // *
export const pool = {
	max: 5,
	min: 0,
	acquire: 30000,
	idle: 10000
};


6. app/controllers/tutorial.controller.js

  • import db from "../models/index.js"는 export default db;로 db라는 변수에 모아서 내보내기를 했기 때문에 import [별명] from '~~' 로 작성한다. 
  • exports.create --> export function create 로 ES module로 변경 (vscode에서 자동으로 해준다..)
import db from "../models/index.js";
const Tutorial = db.tutorials;
const Op = db.Sequelize.Op;

// Create and save a new tutorial
export function create(req, res) {
  if (!req.body.title) {
    res.status(400).send({
      message: "Content can not be empty!",
    });
    return;
  }

  const tutorial = {
    title: req.body.title,
    description: req.body.description,
    published: req.body.published ? req.body.published : false,
  };

  Tutorial.create(tutorial)
    .then((data) => {
      res.send(data);
    })
    .catch((err) => {
      res.status(500).send({
        message:
          err.message || "Some error occurred while creating the tutorial.",
      });
    });
}

// Retrieve all Tutorials from the database.
export function findAll(req, res) {
  const title = req.query.title;
  var condition = title ? { title: { [Op.iLike]: `%${title}%` } } : null;

  Tutorial.findAll({ where: condition })
    .then((data) => {
      res.send(data);
    })
    .catch((err) => {
      res.status(500).send({
        message:
          err.message || "Some error occurred while retrieving tutorials.",
      });
    });
}

// Find a single Tutorial with an id
export function findOne(req, res) {
  const id = req.params.id;

  Tutorial.findByPk(id)
    .then((data) => {
      res.send(data);
    })
    .catch((err) => {
      res.status(500).send({
        message: "error retrieving Tutorial with id =" + id,
      });
    });
}

// Update a Tutorial by the id in the request
export function update(req, res) {
  const id = req.params.id;

  Tutorial.update(req.body, {
    where: { id: id },
  })
    .then((num) => {
      if (num == 1) {
        res.send({
          message: "Tutorial was updated successfully.",
        });
      } else {
        res.send({
          message: `Cannot update Tutorial with id=${id}. Maybe Tutorial was not found or req.body is empty!`,
        }); 
      }
    })
    .catch((err) => {
      res.status(500).send({
        message: "Error updating Tutorial with id= " + id,
      });
    });
}

// Delete a Tutorial with the specified id in the request
const _delete = (req, res) => {
    const id = req.params.id;

    Tutorial.destroy({
        where: { id: id },
    })
        .then((num) => {
            if (num == 1) {
                res.send({
                    message: "Tutorial was deleted successfully!",
                });
            } else {
                res.send({
                    message: `Cannot delete Tutorial with id =${id}. Maybe Tutorial was not found!`,
                });
            }
        })
        .catch((err) => {
            res.status(500).send({
                message: "Could not delete Tutorial with id = " + id,
            });
        });
};
export { _delete as delete };

// Delete all Tutorials from the database.
export function deleteAll(req, res) {
  Tutorial.destroy({
    where: {},
    truncate: false,
  })
    .then((nums) => {
      res.send({ message: `${nums} Tutorials were deleted successfully!` });
    })
    .catch((err) => {
      res.status(500).send({
        message:
          err.message || "Some error occurred while removingall tutorials.",
      });
    });
}

// Find all published Tutorials
export function findAllPublished(req, res) {
  Tutorial.findAll({ where: { published: true } })
    .then((data) => {
      res.send(data);
    })
    .catch((err) => {
      res.status(500).send({
        message:
          err.message || "Some error occurred while retrieving tutorials.",
      });
    });
}


7. app/models/tutorial.model.js

  • tutorial이라는 테이블 정의하기
export default (sequelize, Sequelize) => {
	const Tutorial = sequelize.define("tutorial", {
		title: {
  			type: Sequelize.STRING
		},
  		description: {
  			type: Sequelize.STRING
		},
        published: {
            type: Sequelize.BOOLEAN
		}
	});

	return Tutorial
};


8. app/models/index.js

  • db.config.js 에서 export를 여러개로 나눠서 작성했기 때문에 import * as [별명] from '~~' 이렇게 작성하여 한번에 불러올 것이다.
  • const Sequelize = require('sequelize'); --> import { Sequelize } from 'sequelize';
  • (alias) class Sequelize
    import Sequelize
    This is the main class, the entry point to sequelize. To use it, you just need to import sequelize:
    const Sequelize = require('sequelize');
import * as dbConfig from '../config/db.config.js';
import { Sequelize } from 'sequelize';
import tutorialModel from './tutorial.model.js';

const sequelize = new Sequelize(dbConfig.DB, dbConfig.USER, dbConfig.PASSWORD, {
	host: dbConfig.HOST,
  	dialect: dbConfig.dialect,
  	operatorsAliases: false,
  	pool: {
    	max: dbConfig.pool.max,	
   		min: dbConfig.pool.min,
      	acquire: dbConfig.pool.acquire,
      	idle: dbConfig.pool.idle
    }
});

const db = {Sequelize : Sequelize, sequelize : sequelize, tutorials : tutorialModel(sequelize, Sequelize)};

export default db;


9. 이제 서버 실행해보기

  • 프로젝트 폴더 경로에서 node index.js 로 서버 실행
  • 서버를 실행하면 만들어둔 데이터베이스에 tutorial table이 생성된다.


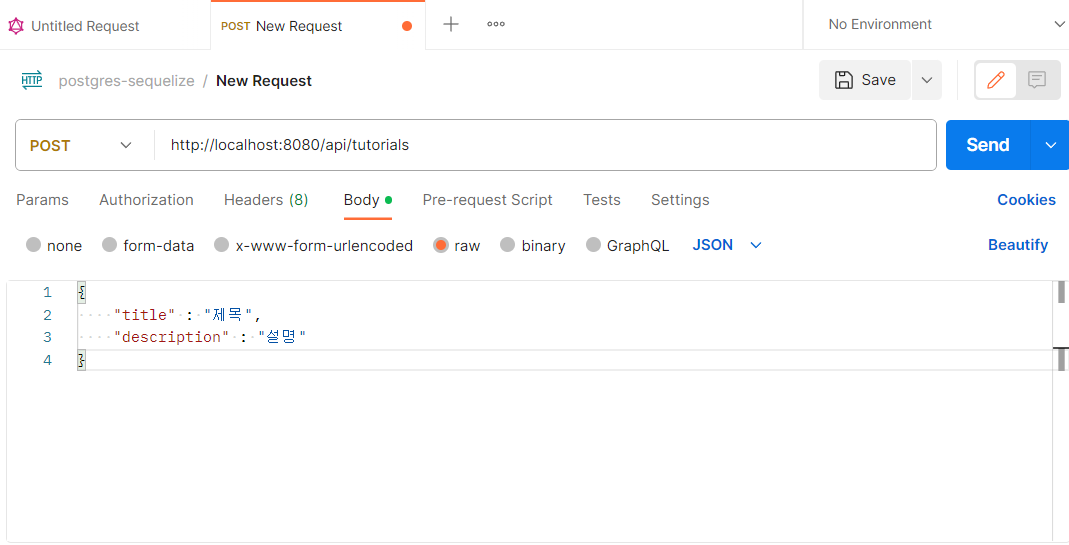
10. POSTMAN에서 Request해보기

  • 오랜만에 사용해보는데 잘 안돼서 찾아보니 인터넷에서 요청을 보낼 수 없고 desktop app을 설치하여 요청을 보내야한다.
  • 아래처럼 해본다.

  • 성공하면 밑에 이렇게 뜬다.

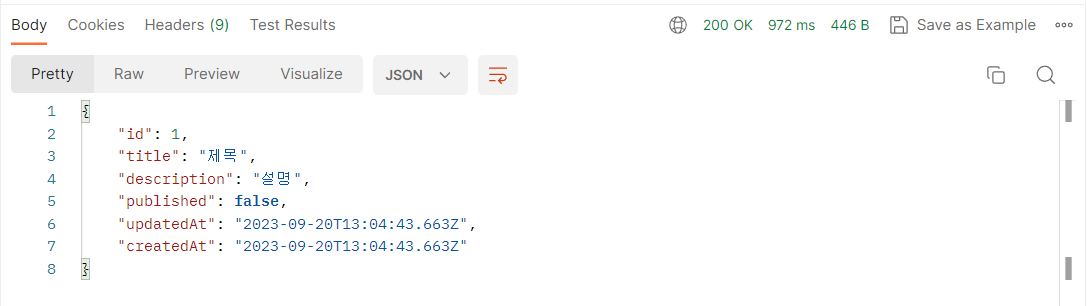
  • postgres shell에서도 확인해보면 똑같이 뜬다.


10. 끝이다.

'개발 > Node.js' 카테고리의 다른 글

데이터베이스 권한 : admin/moderator/user  (0) 2023.09.22
ORM에 대하여  (0) 2023.09.21
node 미들웨어 에러처리  (0) 2023.09.15
Node 프레임워크 14가지  (0) 2023.08.18
페이지네이션  (0) 2023.08.04

참고)

https://cheony-y.tistory.com/198

https://velog.io/@seo__namu/Express-%EC%98%A4%EB%A5%98-%EC%B2%98%EB%A6%AC-%EB%AF%B8%EB%93%A4%EC%9B%A8%EC%96%B4-%ED%99%9C%EC%9A%A9%ED%95%98%EA%B8%B0


에러 처리 미들웨어

매개변수가 err, req, res, next로 네 가지가 필요하다.

console.log(err)를 통해 콘솔에서 에러를 확인할 수 있고 브라우저에서는 '에러가 났다'만 보여진다.

app.use((error, req, res, next) => {
  console.log(error);
  res
    .status(error.status || 500)
    .send({'에러가 났다'});
});


미들웨어를 통해 에러처리

app.use((req, res, next) => {
	res.status(404).send('404 에러처리');
});


오류 클래스 만들어서 오류 처리하기

Error 클래스를 상속받아서 오류 클래스를 작성을 한다.

에러 코드, 메세지, 이름 정의.

class MethodNotAllowed extends Error {
  status = 405;
  constructor(message = '사용할 수 없는 메소드입니다.') {
    super(message);
    this.name = 'Method Not Allowed';
  }
}
module.exports = MethodNotAllowed;

존재하지 않는 경로로 요청이 들어왔을 때 보여주는 오류

const MethodNotAllowed = require('./error/methodNotAllowed');
app.all('*', (res, req) => {
  throw new MethodNotAllowed();
});

'개발 > Node.js' 카테고리의 다른 글

ORM에 대하여  (0) 2023.09.21
node + postgreSQL + Sequelize  (0) 2023.09.20
Node 프레임워크 14가지  (0) 2023.08.18
페이지네이션  (0) 2023.08.04
Json Web Token 이란?  (0) 2023.08.03

참고)

https://reactnavigation.org/docs/getting-started/


ReactNative + Typescript 


1. App.tsx에 네비게이션을 생성한다. (app.tsx, index.js 등에서 네비게이션을 생성한다.)

name : 네비게이션을 할 때 넘겨줄 스크린 이름을 지정

component: 스크린

options : 옵션

headerShown : 페이지마다 헤더를 보여준다. default : true

title : 헤더에 쓰일 제목을 바꾼다. default : name

import React from 'react';
import {
  DisasterGuideScreen
} from './src/screens/index.js';
import {createStackNavigator} from '@react-navigation/stack';
import {NavigationContainer} from '@react-navigation/native';

const App = () => {
  const Stack = createStackNavigator();

  return (
    <NavigationContainer>
      <Stack.Navigator>
        <Stack.Screen
          name="DisasterGuides"
          options={{headerShown: false}}
          component={DisasterGuideScreen}
        />
        <Stack.Screen
          name=""
          options={}
          component={}
        />
        ...
      </Stack.Navigator>
    </NavigationContainer>
  );
};

export default App;


2. 연결할 스크린을 만든다. 

기본 적인 틀)

import React from 'react';
import {View, Text} from 'react-native';

const DisasterGuide: React.FC = () => {

  return (
    <View style={{margin:20}}>
        <Text>기본틀</Text>
    </View>
  );
};

export default DisasterGuide;

navigate할 때 파라미터를 넘겨주는 경우)

route를 props로 지정하고 route.params로 넘겨받은 데이터를 새로 만든 변수에 저장하여 사용한다

import React from 'react';
import {Text, View} from 'react-native';

interface Props {
    route: any;
}

const DisasterGuide: React.FC<Props> = ({route}) => {
    const {guideInformation} = route.params;
  
  return (
    <View style={{margin:20}}>
        <Text>{guideInformation[0]}</Text>
    </View>
  );
};

export default DisasterGuide;

3. 네비게이션 버튼 만들기

기본 적인 틀)

navigation.navigate('DisasterGuides');

navigate할 때 파라미터를 넘겨주는 경우)

import React from 'react';
import {View, TouchableOpacity} from 'react-native';

interface GuideFooterProps {
  navigation: any;
}
const GuideFooter: React.FC<GuideFooterProps> = ({navigation}) => {

  const value = ['a','b','c']

  return (
    <View>
      <TouchableOpacity
          onPress={() => {
            navigation.navigate('DisasterGuides', {
                guideInformation: value,
              });
          }}>
      </TouchableOpacity>
    </View>
  );
};

export default GuideFooter;


참고


https://stackoverflow.com/questions/40762475/what-is-the-difference-between-google-compute-engine-app-engine-and-container-e


Cloud Functions (FaaS) 응용 계층을 추상화하고 원자력 서비스 호출을 위한 제어 표면을 제공합니다.

App Engine (PaaS) 인프라스트럭처를 추상화하고 애플리케이션 계층에서 제어 표면을 제공합니다.

Kubernetes Engine (CaaS) VM을 추상화하고 kubernetes 클러스터 및 호스트된 컨테이너를 관리하기 위한 제어 영역을 제공합니다.

Compute Engine (IaaS) 기본 하드웨어를 추상화하고 인프라 구성 요소에 대한 제어 영역을 제공합니다.

  • App Engine 표준: 제한된 런타임(Python, Java, PHP, Go), 매우 간단한 시작 및 실행, 자동 확장 등. App Engine용으로 특별히 설계된 집중 API입니다.
  • App Engine 유연성: 컨테이너에 넣을 수 있는 모든 것, 자동 확장 등
  • 컨테이너 엔진: 마이크로 서비스 측면에서 애플리케이션을 설계하고 확장 방법 등을 지정하지만 컨테이너 엔진( Kubernetes 의 Google Cloud Platform 구현 )이 확장을 수행하도록 합니다.
  • Compute Engine: 기본적으로 이점이 있는 호스팅된 VM입니다. 실시간 마이그레이션, 관리형 인스턴스 그룹 내 자동 크기 조정과 같은 일부 기능은 위의 기능보다 훨씬 "베어메탈"에 가깝습니다.

'베어메탈(Bare Metal)'이란 용어는 원래 하드웨어 상에 어떤 소프트웨어도 설치되어 있지 않은 상태를 뜻합니다. 즉, 베어메탈 서버는 가상화를 위한 하이퍼바이저 OS 없이 물리 서버를 그대로 제공하는 것을 말합니다. 따라서 하드웨어에 대한 직접 제어 및 OS 설정까지 가능합니다.


App Engine Standard는 '0으로 확장'을 지원합니다. 즉, 앱에 트래픽이 발생하지 않으면 완전히 휴면 상태가 될 수 있습니다. 따라서 취미 프로젝트를 위한 훌륭한 환경이 됩니다.

1. [App Engine에서 Node.js 앱 빌드] 를 따라서 설치와 설정 등을 해준다.

https://cloud.google.com/appengine/docs/standard/nodejs/building-app?hl=ko 


App Engine에서 Node.js 앱 빌드  |  Google App Engine 표준 환경 문서  |  Google Cloud

의견 보내기 App Engine에서 Node.js 앱 빌드 컬렉션을 사용해 정리하기 내 환경설정을 기준으로 콘텐츠를 저장하고 분류하세요. 이 가이드를 활용하면 App Engine을 시작하고 앱 배포 및 관리에 익숙해

cloud.google.com

2. 공개 IP Cloud SQL 인스턴스 만들기

https://cloud.google.com/sql/docs/postgres/connect-instance-app-engine?hl=ko#expandable-1 


App Engine 표준 환경에서 PostgreSQL용 Cloud SQL에 연결  |  Google Cloud

Google Cloud 콘솔을 사용하여 PostgreSQL 인스턴스에 연결된 App Engine 표준 환경에 샘플 앱을 배포하는 방법을 알아봅니다.

cloud.google.com

3. Cloud SQL Node.js Connector로 PostgreSQL 정의하기.

https://github.com/GoogleCloudPlatform/cloud-sql-nodejs-connector#using-with-postgresql


GitHub - GoogleCloudPlatform/cloud-sql-nodejs-connector: A JavaScript library for connecting securely to your Cloud SQL instance

A JavaScript library for connecting securely to your Cloud SQL instances - GitHub - GoogleCloudPlatform/cloud-sql-nodejs-connector: A JavaScript library for connecting securely to your Cloud SQL in...

github.com


3번 설명)

GCP의 Cloud SQL 문서에서 보면 [App Engine 표준 환경에서 연결]

이렇게 두가지 방법을 소개한다.

먼저 Unix 소켓 예제를 보면 knex를 사용하여 postgresql을 연결하는 코드가 설명되어 있다.

이것의 단점은

1. 원래 postgresql 연결에 사용했던 pg 모듈이 아니기 때문에 코드를 바꿔야하고

2. 무엇보다 local에서는 쉽게 작동이 되는데 gcp에 배포했을 때는 안됐다. 데이터베이스 설정 부분이 문제가 있을 것 같다.


그래서 두번째 방법인 Cloud SQL Connector로 결국 연결에 성공하였다.

3번의 링크에 들어가면 예제가 있다. 아래는 데이터베이스 연결부분만 따로 파일을 만든 것이다.(db.js)

또, Connector 부분만 추가되어서 pg 문법을 그대로 사용하면 된다. 바꿀 것이 없다.

import pg from "pg";
import { Connector } from '@google-cloud/cloud-sql-connector';
const { Pool } = pg;

const connector = new Connector();
const clientOpts = await connector.getOptions({
  instanceConnectionName: process.env.INSTANCE_UNIX_SOCKET,
  ipType: 'PUBLIC', 
});

const dbConfig = {
  ...clientOpts,
  user: process.env.PG_USER,
  password: process.env.PG_PASSWORD,
  database: process.env.PG_DATABASE,
};

const client = new Pool(dbConfig);

export default client;

그리고 process.env.~는 dotenv에 정의하지 않고 1번에서 만들었던 app.yaml 파일에 정의한다.

runtime: nodejs16

env_variables:
  INSTANCE_UNIX_SOCKET: 
  PG_USER: 
  PG_PASSWORD: 
  PG_DATABASE:

SQL > 개요

INSTANCE_UNIX_SOCKET 위 이미지의 연결이름 부분을 복사해서 그대로 적으면 된다.

user와 database name을 잘 모르겠다면 각각의 탭에 들어가서 확인할 수 있는데 기본적으로 postgres로 설정이 되어있었다.


try~catch~finally

try : 예외가 발생할지도 모르는 코드를 정의한다.

catch : try절에서 예외가 발생할 경우 실행되는 코드를 정의한다.

finally : 예외와 상관없이 무조건 실행되는 코드를 정의한다.


  • try는 catch와 finally 중 1가지 이상과 함께 사용된다.
  • return, continue, break 문 등으로 인해 try 절이 끝나게 되면 finally까지 실행이 된 후에 돌아갈 곳으로 돌아가게 된다.
  • 만약 finally 절 안에서 rerurn, continue, break, throw가 발생하게 되면 try에서 먼저 발생한 return, continue, break는 무시되고 finally 절 안의 것만 처리된다.
  • 예외 처리는 확실한 예외 처리를 보장하지만 처리에 시간과 메모리가 많이 소요된다.
  • catch(err) : err 객체에는 name과 message 프로퍼티가 있다. 간단한 에러일 때는 (err) 없이 사용할 수 있다.


throw

예외를 강제로 발생시켜야 경우에 사용한다. 객체를 잘못 사용하는 사용자에게 예외를 강제로 발생시켜서 사용자에게 주의를 줄 수도 있고 예외와 관련된 처리를 해달라고 부탁할 수도 있습니다.

new Error("어떤 에러가 발생했습니다."), new SyntaxError, new ReferenceError

let div = 0;
let num1 = 2;
let num2 = 0;

try {
    if (num2 === 0) {
        throw new Error('0으로 나누기');
    }
    div = num1 / num2;
}
catch (e) {
    console.log(e.message); //0으로 나누기
}

2 나누기 0은 에러가 날 일이 없지만 강제로 예외를 발생시켜서 처리해줄 수 있다.


ReactNative에서 react-hook-form을 사용하려면?

➫ Controller 사용해야함.

  1. handleSubmit(onSubmit) : data에는 각 value가 들어간다. {ID: '', Password: '', Confirm: ''}
  2. rules : 
    1. required : boolean
    2. maxLength, max : number
    3. minLength, min : number
    4. pattern : 정규표현식
    5. validate : function
    6. valueAsNumber, valueAsDate : boolean
    7. setValueAs : <T>(value: any) => T
    8. disable : boolean = false
    9. onChange : (e: SyntheticEvent) => void
    10. onBlur : (e: SyntheticEvent) => void
import { Text, View, TextInput, Button, Alert } from "react-native";
import { useForm, Controller } from "react-hook-form";

export default function App() {
  const { control, handleSubmit, formState: { errors }, watch } = useForm({
    defaultValues: {
      ID: '',
      Password: '',
      Confirm: ''
    }
  });
  
  const password = useRef({});
  password.current = watch("Password", "");
  
  const onSubmit = data => console.log(data); // {ID: '', Password: '', Confirm: ''}
 
  return (
    <View>
      <Controller
        control={control}
        rules={{
            minLength: {
                value: 8,
                message: "아이디 8글자 이상 입력하시오"
            },
            maxLength: {
                value: 15,
                message: "아이디를 15글자 이하 입력하시오"
            },
            required: {
                value: true,
                message: "아이디를 입력하시오"
            }

        }}
        render={({ field: { onChange, onBlur, value } }) => (
          <TextInput
            placeholder="ID"
            onBlur={onBlur}
            onChangeText={onChange}
            value={value}
          />
        )}
        name="ID"
      />
      {errors.ID && <Text style={{color: 'red'}}>{errors.ID.message}</Text>} // rules에 적은 message가 조건에 맞게 나온다

      <Controller
        control={control}
        rules={{
            minLength: {
                value: 8,
                message: "비밀번호를 8글자 이상 입력하시오"
            },
            maxLength: {
                value: 20,
                message: "비밀번호를 20글자 이하 입력하시오"
            },
            required: {
                value: true,
                message: "비밀번호를 입력하시오"
            }
        }}
        render={({ field: { onChange, onBlur, value } }) => (
          <TextInput
            placeholder="Password"
            onBlur={onBlur}
            onChangeText={onChange}
            value={value}
          />
        )}
        name="Password"
      />
      {errors.Password && <Text style={{color: 'red'}}>{errors.Password.message}</Text>}
      
      <Controller
        control={control}
        rules={{
            validate: (value) => value === password.current || "비밀번호가 일치하지 않습니다", // 조건이 맞는지 확인한다. 위에서 선언한 password 변수, watch를 이용하여 Password의 value가 저장된다
            required: {
                value: true,
                message: "비밀번호를 입력하시오"
            }
        }}
        render={({ field: { onChange, onBlur, value } }) => (
          <FormInput
            secureTextEntry={true}
            placeholder="비밀번호 확인"
            onBlur={onBlur}
            onChangeText={onChange}
            value={value}
          />
        )}
        name="Confirm"
      />
        {errors.Confirm && <Text style={{color: 'red'}}>{errors.Confirm.message}</Text>}

      <Button title="Submit" onPress={handleSubmit(onSubmit)} />
    </View>
  );
}

참고

https://iamiwill.tistory.com/17


프론트엔드

import axios from 'axios';
import React, { useState } from 'react';
import Button from 'react-bootstrap/Button';
import Col from 'react-bootstrap/Col';
import Form from 'react-bootstrap/Form';
import Row from 'react-bootstrap/Row';

const SignIns: React.FC = () => {
  const [name, setName] = useState("");
  const [password, setPassword] = useState("");

  const handleSubmit = () => {
    if (name === "" || password === "") {
      alert("빈칸을 모두 채우시오.");
      return;
    }

    let body = {
      user_name: name,
      user_password: password
    };

    axios
      .post("http://localhost:3000/user/login", body)
      .then((res) => console.log(res));

    
  };
  return (
    <div>
            <Form onSubmit={handleSubmit}>
                <div className="mb-3">로그인</div>

                <Form.Group as={Row} className="mb-3" controlId="formHorizontalEmail">
                    <Form.Label column sm={2}>
                        ID
                    </Form.Label>&nbsp;&nbsp;
                    <Form.Control type="name" placeholder="name" onChange={(e) => {setName(e.target.value)}}/>
                </Form.Group>

                <Form.Group as={Row} className="mb-3" controlId="formHorizontalEmail">
                    <Form.Label column sm={2}>
                        Password
                    </Form.Label>&nbsp;&nbsp;
                    <Form.Control type="password" placeholder="password" onChange={(e) => {setPassword(e.target.value)}}/>
                </Form.Group>

                <Form.Group as={Row} className="mb-3">
                    <Col sm={{ span: 10, offset: 2 }}>
                        <Button 
                        type="submit"
                        >
                            Log in
                        </Button>
                    </Col>
                </Form.Group>
            </Form>
        </div>
  )
}

export default SignIns;


백엔드

router.post("/login", async (req, res, next) => {
    console.log(req.body);
    const {user_name, user_password} = req.body;
    try {
        const confirmUser = await client.query(`SELECT * FROM user_account WHERE user_name=$1`, [user_name,]);
        if (confirmUser.rows.length !== 0) {
            let validatePassword = bcrypt.compare(user_password, confirmUser.rows[0].password_hash)
            if(!validatePassword){
                return res.status(409).json({
                    error: "비밀번호가 틀렸습니다.",
                });
            }
        
            res.status(200).json({message: 'Login successful'})
        } else {
            return res.status(409).json({
                error: "아이디가 존재하지 않습니다.",
            });
        }
    } catch (err) {
        console.error(err);
    }
});

confirmUser를 출력해보면 rows 안에 알맞은 데이터가 들어있다. 이 rows는 user_name을 unique로 만들었기 때문에 크기가 0 또는 1인 배열이 된다.

그래서 데이터에 접근할 때 confirmUser.rows[0].password_hash로 접근할 수 있다.


로그인과 회원가입에 사용하는 user_account table

create table user_account (
    user_id serial PRIMARY KEY,
    user_name varchar(80) unique not null,
    password_hash varchar(128) not null,
    join_date date not null default now()
);


출처

https://velog.io/@yenicall/%EC%95%94%ED%98%B8%ED%99%94%EC%9D%98-%EC%A2%85%EB%A5%98%EC%99%80-Bcrypt

https://blog.logrocket.com/password-hashing-node-js-bcrypt/


단방향 암호화란?

  • 단방향 암호화는 평문을 암호화 할 수는 있지만 암호화된 문자를 다시 평문으로 복호화가 불가능한 방식이다.
  • 단방향 암호화를 사용하는 주된 이유는 메시지 또는 파일의 무결성(integrity)을 보장하기 위해서다.
  • 원본의 값이 1bit라도 달라지게 된다면, 해시 알고리즘을 통과한 후의 해시값은 매우 높은 확률로 달라진다.
  • 해시의 무결성을 보장하는 특징을 이용하여 저자 서명, 파일 또는 데이터의 식별자, 사용자의 비밀번호, 블록체인 등에서 활용되고 있다.
  • 대표적인 해시 알고리즘으로는 MD5, SHA 등이 있다.

단방향 암호화 한계

  • 해시 알고리즘은 동일한 평문에 대하여 항상 동일 해시값을 갖는다. 따라서 특정 해시 알고리즘에 대해 특정 평문이 어떤 해시값을 갖는 지 알 수 있다.
  • 또한 해시 함수는 본래 데이터를 빠르게 검색하기 위해서 탄생됐다. 공격자는 매우 빠른 속도로 임의의 문자열의 해시값과 해킹할 대상의 해시값을 비교해 대상자를 공격할 수 있다.

단방향 암호화 보완

  • 솔팅(Salting) : 본래 데이터에 추가 랜덤 데이터를 더하여 암호화를 진행하는 방식이다. 추가 데이터가 포함 되었기 때문에 원래 데이터의 해시값에서 달라진다.
  • 키 스트레칭(Key Stretching) : 단방향 해시값을 계산 한 후 그 해시값을 해시하고 또 이를 반복하는 방식이다. 

Bcrypt란?

키(key) 방식의 대칭형 블록 암호에 기반을 둔 암호화 해시 함수다.

레인보우 테이블 공격을 방지하기 위해 솔팅키 스트레칭을 적용한 대표적인 예다.

  • 구조
$\[algorithm]$[cost]$[salt\][hash]
// $2b$10$b63K/D03WFBktWy552L5XuibmiD5SxCrKg9kHCqOYaZwxRjIg14u2
  • Algorithm: "$2a$" 또는 "$2b$" 으로 둘 다 BCrypt를 의미한다.
  • Cost: 키 스트레칭의 수로 2의 cost승
  • Salt: (16-byte (128-bit)), base64 encoded to 22 characters
  • Hash: (24-byte (192-bit)), base64 encoded to 31 characters

node.js 환경에서 bcrypt로 비밀번호 암호화하기

bcrypt 설치하기

npm i bcrypt --save

bcrypt 사용법

1. 직접 salt를 생성하여 해시하기

bcrypt
  .genSalt(saltRounds)
  .then(salt => {
    console.log('Salt: ', salt)
    return bcrypt.hash(password, salt)
  })
  .then(hash => {
    console.log('Hash: ', hash)
  })
  .catch(err => console.error(err.message))

2. salt를 자동으로 만들어서 해시하기

bcrypt
  .hash(password, saltRounds)
  .then(hash => {
    console.log('Hash ', hash)
  })
  .catch(err => console.error(err.message))

3. 검증하기

bcrypt
  .hash(password, saltRounds)
  .then(hash => {
          userHash = hash 
    console.log('Hash ', hash)
    validateUser(hash)
  })
  .catch(err => console.error(err.message))

function validateUser(hash) {
    bcrypt
      .compare(password, hash)
      .then(res => {
        console.log(res) // return true
      })
      .catch(err => console.error(err.message))        
}

출처

https://dev.to/shreshthgoyal/user-authorization-in-nodejs-using-postgresql-4gl


1. postgresql 데이터베이스 접속

db.js

const {Pool} = require("pg");
require("dotenv").config();

const dbConfig = {
  user: process.env.PG_USER,
  password: process.env.PG_PASSWORD,
  host: process.env.PG_HOST,
  port: process.env.PG_PORT,
  database: process.env.PG_DATABASE,
};

const client = new Pool(dbConfig);
client.connect();

module.exports = client;


2. 라우터 만들기

axios body를 가져오기 위하여 body-parser 모듈이 필요함.

...
const bodyParser = require("body-parser");
const userRouter = require('./routes/user');
...
app.use(bodyParser.json())
...
app.use('/user', userRouter)
...

데이터베이스 접속이 필요한 곳 (user.js)에 db.js 가져오기

const express = require("express");
const router = express.Router();
const client = require("../db");

router.post("/register", async (req, res, next) => {
    console.log(req.body);
    const {user_name, user_password} = req.body;
    ...
});

module.exports = router;


3. user_account 테이블에 아이디 비밀번호 insert 하기 

bcrypt : 비밀번호 해싱

jsonwebtoken : 웹토큰


아이디(user_name)가 이미 사용되고 있는 아이디인지 확인하고 맞으면 409 에러 메세지를 반환한다.

새로운 아이디가 맞다면 비밀번호를 해싱하고 user_account에 insert 한다.

...
const bcrypt = require("bcrypt");
const jwtGenerator = require("jsonwebtoken");

router.post("/register", async (req, res, next) => {
    console.log(req.body);
    const {user_name, user_password} = req.body;
    try {
            const confirmUser = await client.query(`SELECT * FROM user_account WHERE user_name=$1`, [user_name,]);
            if (confirmUser.rows.length !== 0) {
                return res.status(409).json({
                    error: "Sorry! An account with that ID already exists!",
                });
                
            } else {
                bcrypt.hash(user_password, 10, async (err, hashedPassword) => {
                    if (err) {
                        return res.status(500).json({
                            error: err.message,
                        });
                    } else {
                        const userQuery = `INSERT INTO user_account(user_name, password_hash) VALUES($1, $2) RETURNING user_id`;
                        const user_no = await client.query(userQuery, [user_name,hashedPassword]);

                        const token = jwtGenerator(user_id);

                        res.status(200).json({
                            message: `Account created successfully!`,
                            token,
                        });
                    }
                })
            }
    } catch (err) {
        console.error(err);
    }
});

module.exports = router;

+ Recent posts